Showing posts with label Chicken. Show all posts

Sticky Lemon Chicken & Egg Fried Rice: Recipe

Posted by Charlie @ Discovering Mandarin Sunday, 4 October 2009 0 comments

Sticky Lemon Chicken & Egg Fried Rice
Serves 2


This is a simple recipe for sticky lemon chicken and egg fried rice. I served it as you might find in a restuarant. It is a tasty dish and very more-ish, both my girlfriend and I loved this recipe and will certainly be cooking this lemon chicken recipe again. The sweet honey and lemon flavour mixed with the flavour-some egg fried rice is very refreshing.

Prep time: 35 mins
Cooking Time: 25 mins

You Will Need:
2 tbsp Olive oil
2 Boneless Chicken Breasts
4 tbsp Wine Vinegar
2 tbsp dark soy sauce
3 tbsp honey
3 tbsp. brown sugar
1 tbsp. fresh ginger, minced
3 cloves Garlic (finely chopped)
3 Lemons (2 squeezed, 1 Sliced)

Sticky Lemon Chicken Marinade:
4 tbsp Cornflour
2 egg yolks
3 tbsp Water
Salt
Pepper
Thyme

For Egg Fried Rice:
1 cup. Rice
2 egg whites
2 Spring onions
handful of peas

To Serve:
1 sliced lemon
1 Spring Onion

How To Cook Sticky Lemon Chicken & Egg Fried Rice:

1. Boil rice until cooked then leave to the side to cool down. Whilst boiling the rice (about 10 minutes), separate the 2 egg yolks and whites. Combine cornstarch, water and the egg yolks in a bowl; whisk until smooth. Add chicken breasts, coating each piece well.


2. Once the rice has been cooked, place rice aside to cool ready for egg fried rice later.


3. Heat oil in a wok for frying chicken; until sizzling. Fry chicken breasts, part at a time, on both sides until brown and tender. Remove to paper towels and keep warm.


4. Add the wine vinegar, ginger, garlic to the wok and bubble until reduced by half. Add the soy sauce and honey and shake the pan to mix. Add the chicken back to the pan.


5. Pour in a splash of hot water and add the lemon slices. Let the liquid bubble and reduce down until syrupy, which will take about 10 minutes or so. By that time the chicken should be cooked through.


6. Whilst cooking the lemon chicken in the sauce. Heat some oil in another wok. Fry egg until it starts to group together. Add spring onions to the egg for a minute, and then add the rice and peas for a minute making sure to separate the rice as you put it in.


7. Add oyster sauce and soy sauce to the fried rice and fry for one minute longer. Now the chicken should be fully cooked, and (I forgot to do this, this time) add some lemon juice to make the caramalised sauce pourable. Lemon chicken and egg fried rice is now ready to serve.


As I Served it:

(Arrange Chicken breast slightly over lapping on serving dish. Place rice in a cup and flip upside down on the plate. Serve with slices of lemon and sprinkle with scallions.)

You can add the sauce over the top as mentioned above.


Chinese style Hoi Sin Chicken: Recipe

Posted by Charlie @ Discovering Mandarin Thursday, 6 August 2009 0 comments

Chinese style Hoi Sin Chicken
Serves 2


Prep time: 15mins
Cooking Time: 15mins

You Will Need:
300g chicken
1 tablespoon toasted sesame oil
1 tbsp soy sauce
6 tbsp hoi sin sauce
Salt and pepper
4 medium garlic cloves, smashed
150g green beans, cut into 1-inch lengths
1 Bell Pepper
Thinly sliced spring onions
Toasted sesame seeds, for garnish, optional
2 Nests Medium Egg Noodles


To Cook:

1. Cut up chicken into bite-sized chunks. Marinade the chicken in ½ tbsp Hoisin sauce, 1tbsp soy sauce with salt and pepper. Leave in fridge for 20mins.

2. Prepare garlic, green beans, pepper and spring onions, cutting them however you like them. Boil the kettle ready for the noodles to cook in.

3. Heat the oil in the pan, until oil is hot. Fry chicken for about 5mins, then leave to the side, and leave the wok on the heat. Now quickly drop noodles into boiling water.


4. Add garlic, beans and pepper now until the garlic turns brown.


5. Add back the chicken, rest of the hoi sin sauce and the spring onions. Stir fry for a minute and take out the noodles. Add soy sauce to the noodles before serving immediately.


As I Serve it...


Kung Po Chicken: Recipe

Posted by Charlie @ Discovering Mandarin 0 comments

Kung Po Chicken
Serves 4 hungry men

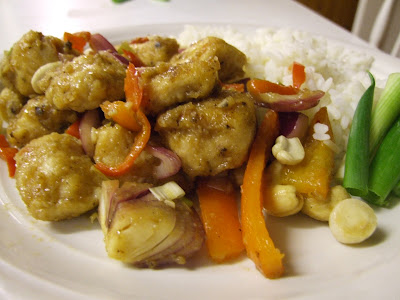
Kung Po Chicken is a favourite of mine at local Chinese Restaurants, So I thought I would give cooking it a go.

This recipe tastes fantastic, and depending on your prefereneces you could make more sauce to make it more like the restaurant version than it's Chinese counterpart.

Prep time: 30mins
Cooking Time:
15mins

You Will Need:

4 Chicken Breasts (500g)

4 Tbsp Cornflour
2 spring onions

1 red pepper

1 Tomato

2 red chillies

4 garlic cloves

3 slices of ginger

Handful of Cashew nuts


For Marinade:

2 Tbsp Rice Wine Vinegar

2 Tbsp Light Soy Sauce

½ Tbsp Sesame oil
Pinch of black pepper


For Kung Po Sauce:

4 Tbsp Soy Sauce
4 Tbsp Rice vinegar

2 Tbsp Brown sugar

1 Tbsp Plum Sauce

1 tbsp Hoisin sauce


1. Prepare the marinade for the Chicken; Mix the soy sauce, rice vinegar and sesame oil with a pinch of black pepper. It does not look like much but will cover the chicken. Cut the chicken into large bite-sized pieces and place in the marinade.

2. Leave the chicken in the fridge to marinate for 25 minutes whilst preparing vegetables, garlic, ginger and chillies.


3.
Now is a good time to wash off the excess starch from the rice. This will prevent it from making a sticky mess. Put the rice in a deep bowl, and in your sink, run cold tap water over it. Once the bowl is full of water, use your fingers to swish the rice around. The water will start getting murky. Now gently pour this water out. Repeat this process till the water is mostly clear. This will take at least 4-5 washes. Now fill it up one last time. Don't wash the rice again. Just leave it in there, covered with water, for about 20 minutes or so, so you can put the rice in to start cooking as you start to fry the chicken.


4.
Combine chicken and cornstarch in the marinade bowl and toss to coat. Heat sesame oil in wok over medium heat.

5.
Add the rice now to a pan (for steamed rice, make sure it is a flat based pan and you have a tight lid) of boiling water, one and a half times the quantity of the dry rice. (1 cup rice, 1 and a half water.) Resist the urge to lift the lid and peek at the rice. Let it cook for 15 minutes on a low setting, and when ready leave to stand for 5 minutes with the lid on before serving. This should be enough time to complete the rest of the meal.

6.
Add chicken to the wok and stir-fry 5-7 minutes or until no longer pink inside. Remove chicken from wok and leave in a bowl ready for later.


7.
Add green onions, garlic, tomato, red pepper, garlic and sliced ginger to the wok and stir fry for 45 seconds.


8. Combine vinegar, soy sauce, hoisin sauce, plum sauce and brown sugar in a small bowl. Mix well and add your Kung Po sauce to the wok.

9. Return chicken to the wok and coat with sauce. Stir in roasted peanuts. Heat thoroughly. Serve.


Serving suggestion:


Serve with Steamed Rice in a bowl, or let everyone share from the middle of the table.


Serve with additional spring onions on top.


As I Serve it:

Enjoy your Kung Po Chicken and Rice.

Recipe Adapted from: BlogChef

Sweet and Sour Chicken & Rice / Ku Lou Yok / 甜酸鸡 : Recipe

Posted by Charlie @ Discovering Mandarin Thursday, 23 July 2009 2 comments

Sweet and Sour Chicken (Ku Lou Yok)
Serves 4 hungry men

This is a hybrid version of Chinese Sweet and Sour Chicken, not quite the usual western take-a-way take on it, where it is often served as an appetiser, though not either quite the full Chinese experience either.


It is a filling and delicious meal that will leave everyone wanting more. Sweet and Sour Chicken is equally good with Pork making it 'Ku Lou Yok' and is enjoyable whilst sharing many dishes, or on its own as the main meal when served with rice. I like to serve this with lots of vegetables and steamed rice as a whole meal.


Prep time: 30mins
Cooking Time: 15mins


You Will Need:
700g Chicken (or Pork if preferred)
500ml of Vegetable Oil (For deep frying)
250g Pineapple Chunks (Drained if in juice)
8tbsp Cornflour
2 Red Onions
2 Carrots
2 Red Chillies
1 Cucumber
2 Tomatoes
4 Cloves Garlic
2 slices of ginger

For Marinade:
2tbsp Soy Sauce
1tbsp Rice Vinegar
1tbsp Sesame Oil
Ground black Pepper

For Sweet and Sour Sauce:
4tbsp Tomato Ketchup
2tbsp Brown Sugar
2tbsp Plum Sauce
2tbsp Rice Vinegar
1tbsp Water

To serve:
300g Long Grain Rice - Steamed (Long-grain rice - 1 cup / Water - 1.5 cups)

To Cook:

1. Prepare the marinade for the Chicken; Mix the soy sauce, rice vinegar and sesame oil with a pinch of black pepper. It does not look like much but will cover the chicken. Cut the chicken into bite-sized pieces and place in the marinade.


2. Leave the chicken in the fridge to marinate for 25 minutes whilst preparing vegetables, garlic, ginger and chillies. Take out the cucumber and tomato pulp so that the veg is crunchier.


3.
Now is a good time to wash off the excess starch from the rice. This will prevent it from making a sticky mess. Put the rice in a deep bowl, and in your sink, run cold tap water over it. Once the bowl is full of water, use your fingers to swish the rice around. The water will start getting murky. Now gently pour this water out. Repeat this process until the water is mostly clear. This will take at least 4-5 washes. Now fill it up one last time. Do not wash the rice again. Just leave it in there, covered with water, for about 20 minutes or so, so you can put the rice in to start cooking as you start to fry the chicken.


4. Coat the marinated chicken in cornflour, ensuring that the chicken is covered in, as much cornflour as possible, do not be scared to get your hands dirty. The better you cover the chicken pieces, the better this batter will work.


5. Add the rice now to a pan (please make sure for steamed rice, it is a flat based pan and you have a tight lid) of boiling water, one and a half times the quantity of the dry rice. (1-cup rice, 1 1/2-cup water.) Resist the urge to lift the lid and peek at the rice. Let it cook for 15 minutes on a low setting, and when ready leave to stand for 5 minutes with the lid on before serving. This should be enough time to complete the rest of the meal.

6. Heat the oil in the Wok hot enough, ready to deep-fry the chicken pieces. Put the chicken pieces in, and fry until golden brown. Drain the oil off the chicken pieces as you take it out and place it in a bowl ready for later.


7. Leave enough oil in the Wok ready to stir fry all the vegetables. Place the chopped garlic and ginger into Wok, and fry until aromatic. Then add cucumber, tomato, carrots, chillies and onion for a couple of minutes.


8. Pour in tomato sauce, plum sauce, vinegar and 1 tbsp of water, stir-fry until mix well and thick, if not think enough, add cornflour until it is thick enough.

9. Add the fried chicken back to the Wok and add the drained Pineapple chunks. Add sugar and salt to taste, and get ready to serve your tasty Sweet and Sour Chicken, with your lovely steamed rice.

Serving suggestion:

Serve with Steamed Rice in a bowl, or let everyone share from the middle of the table.

How about trying this same recipe with Pork Loin instead of Chicken?

Meal as I serve it...

Leave it for everyone to serve themselves...

And get ready to enjoy your Sweet and Sour Chicken...


Recipe Adapted from:
SEAsiaFood
Rice Tip adapted from:
ShiokFood

Discovering Mandarin via email

Enter your email address:

Delivered by FeedBurner

Blogumulus by Roy Tanck and Amanda FazaniInstalled by CahayaBiru.com

Popular Posts

About Me

My Photo
Charlie @ Discovering Mandarin
View my complete profile